Explanations and step-by-steps with Python codes for the camera calibration
1. Helpful websites
- OpenCV - Camera Calibration
- MathWorks - What Is Camera Calibration?
- OpenCV Camera Calibration by Ali Yasin Eser
- Understanding Lens Distortion
2. Camera calibration?
Camera calibration is a process in the field of computer vision and image processing where the properties of a camera are determined to understand its output better. The main goals of camera calibration are:
Determining Intrinsic Parameters: These include the camera’s focal length, optical center, and lens distortion (such as radial and tangential distortions). Intrinsic parameters are specific to the camera and do not depend on the camera’s position or orientation in space.
Determining Extrinsic Parameters: These parameters describe the camera’s position and orientation in the world. They define the relationship between the camera’s coordinate system and a world coordinate system.
Lens Distortion Correction: Cameras often introduce some distortion to images, particularly wide-angle lenses. Calibration helps to model and correct these distortions, resulting in images that more accurately represent the observed scene.
Enabling 3D Scene Reconstruction: By understanding the camera’s properties, it’s possible to reconstruct a three-dimensional scene from two-dimensional images.
Improving Image Quality and Measurement Accuracy: Calibration ensures that images and measurements taken with the camera accurately reflect the size, shape, and position of objects in the scene.
The process usually involves capturing images of a known pattern (like a checkerboard) under various orientations and using these images to compute the camera’s parameters. This information is crucial for applications like robotic vision, augmented reality, 3D modeling, and other areas where precise visual measurements are needed.
3. Finding intrinsic parameters and distortion correction
Camera calibration primarily involves two key steps: 1. Determining Intrinsic Parameters and 3. Lens Distortion Correction. By executing these steps and incorporating extrinsic parameters, which describe the camera’s position and rotation, we can accurately deduce the 3D location of a target point from a 2D image. The focus of camera calibration is largely on rectifying distortions in images captured by the camera. Since all cameras with lenses invariably introduce some level of distortion, calibration is essential for restoring the image to a more accurate representation of the scene.

4. What to find?
4.1. Instrisic parameters
Intrinsic parameters is a $3 \times 3$ matrix. \(K = \begin{bmatrix} f_{x} & 0 & c_{x} \\ 0 & f_{y} & c_{y} \\ 0 & 0 & 1 \end{bmatrix}\), where $(f_x, f_y)$ are focal length and $(c_x, c_y)$ are optical centers.
4.2. Distortion coefficients
$\text{Distortion}\,\text{coefficents}, D= (k_1,\, k_2,\, p_1,\, p_2,\, k_3)$, where $k_x$ means the radial distortion coefficients of the lens and $p_x$ means tengential distortion.
5. Steps to retrieve $K$ and $D$
- Fix camera and turn off the auto-focus function
- Prepare a checkerboard
- Take the pictures of the checkerboard from diverse angles and positions
- Extracts the parameters ($K$, $D$)
- Check results
- Play with coefficients
5.1. Fix camera and turn off the auto-focus feature
Turning off the auto-focus feature is crucial if your camera is equipped with it, as this ensures consistency in the focal lengths $f_x$ and $f_y$ during calibration. Subsequently, it is advisable to determine the optimal distance from the camera where it consistently produces well-focused images. This step is key to maintaining uniform focus quality throughout the calibration process.
5.2. Prepare a checkerboard
Click on the checkerboard image below to download the PDF file. Alternatively, you can create your own checkerboard using PowerPoint or Adobe Illustrator. The crucial aspect is to ensure high print quality for accurate corner detection. Additionally, pay attention to the size of the board. At the optimal focus distance, the board should occupy less than two-thirds of the field of view to guarantee that all corners are clearly captured in the image.

Remember to affix the printed checkerboard onto a flat and rigid surface for optimal results.
5.3. Take the pictures of the checkerboard in diverse angles/locations
The Python code provided below is designed to enable your camera to capture images at three-second intervals. It is important to photograph the checkerboard from various angles and x-, y-positions.
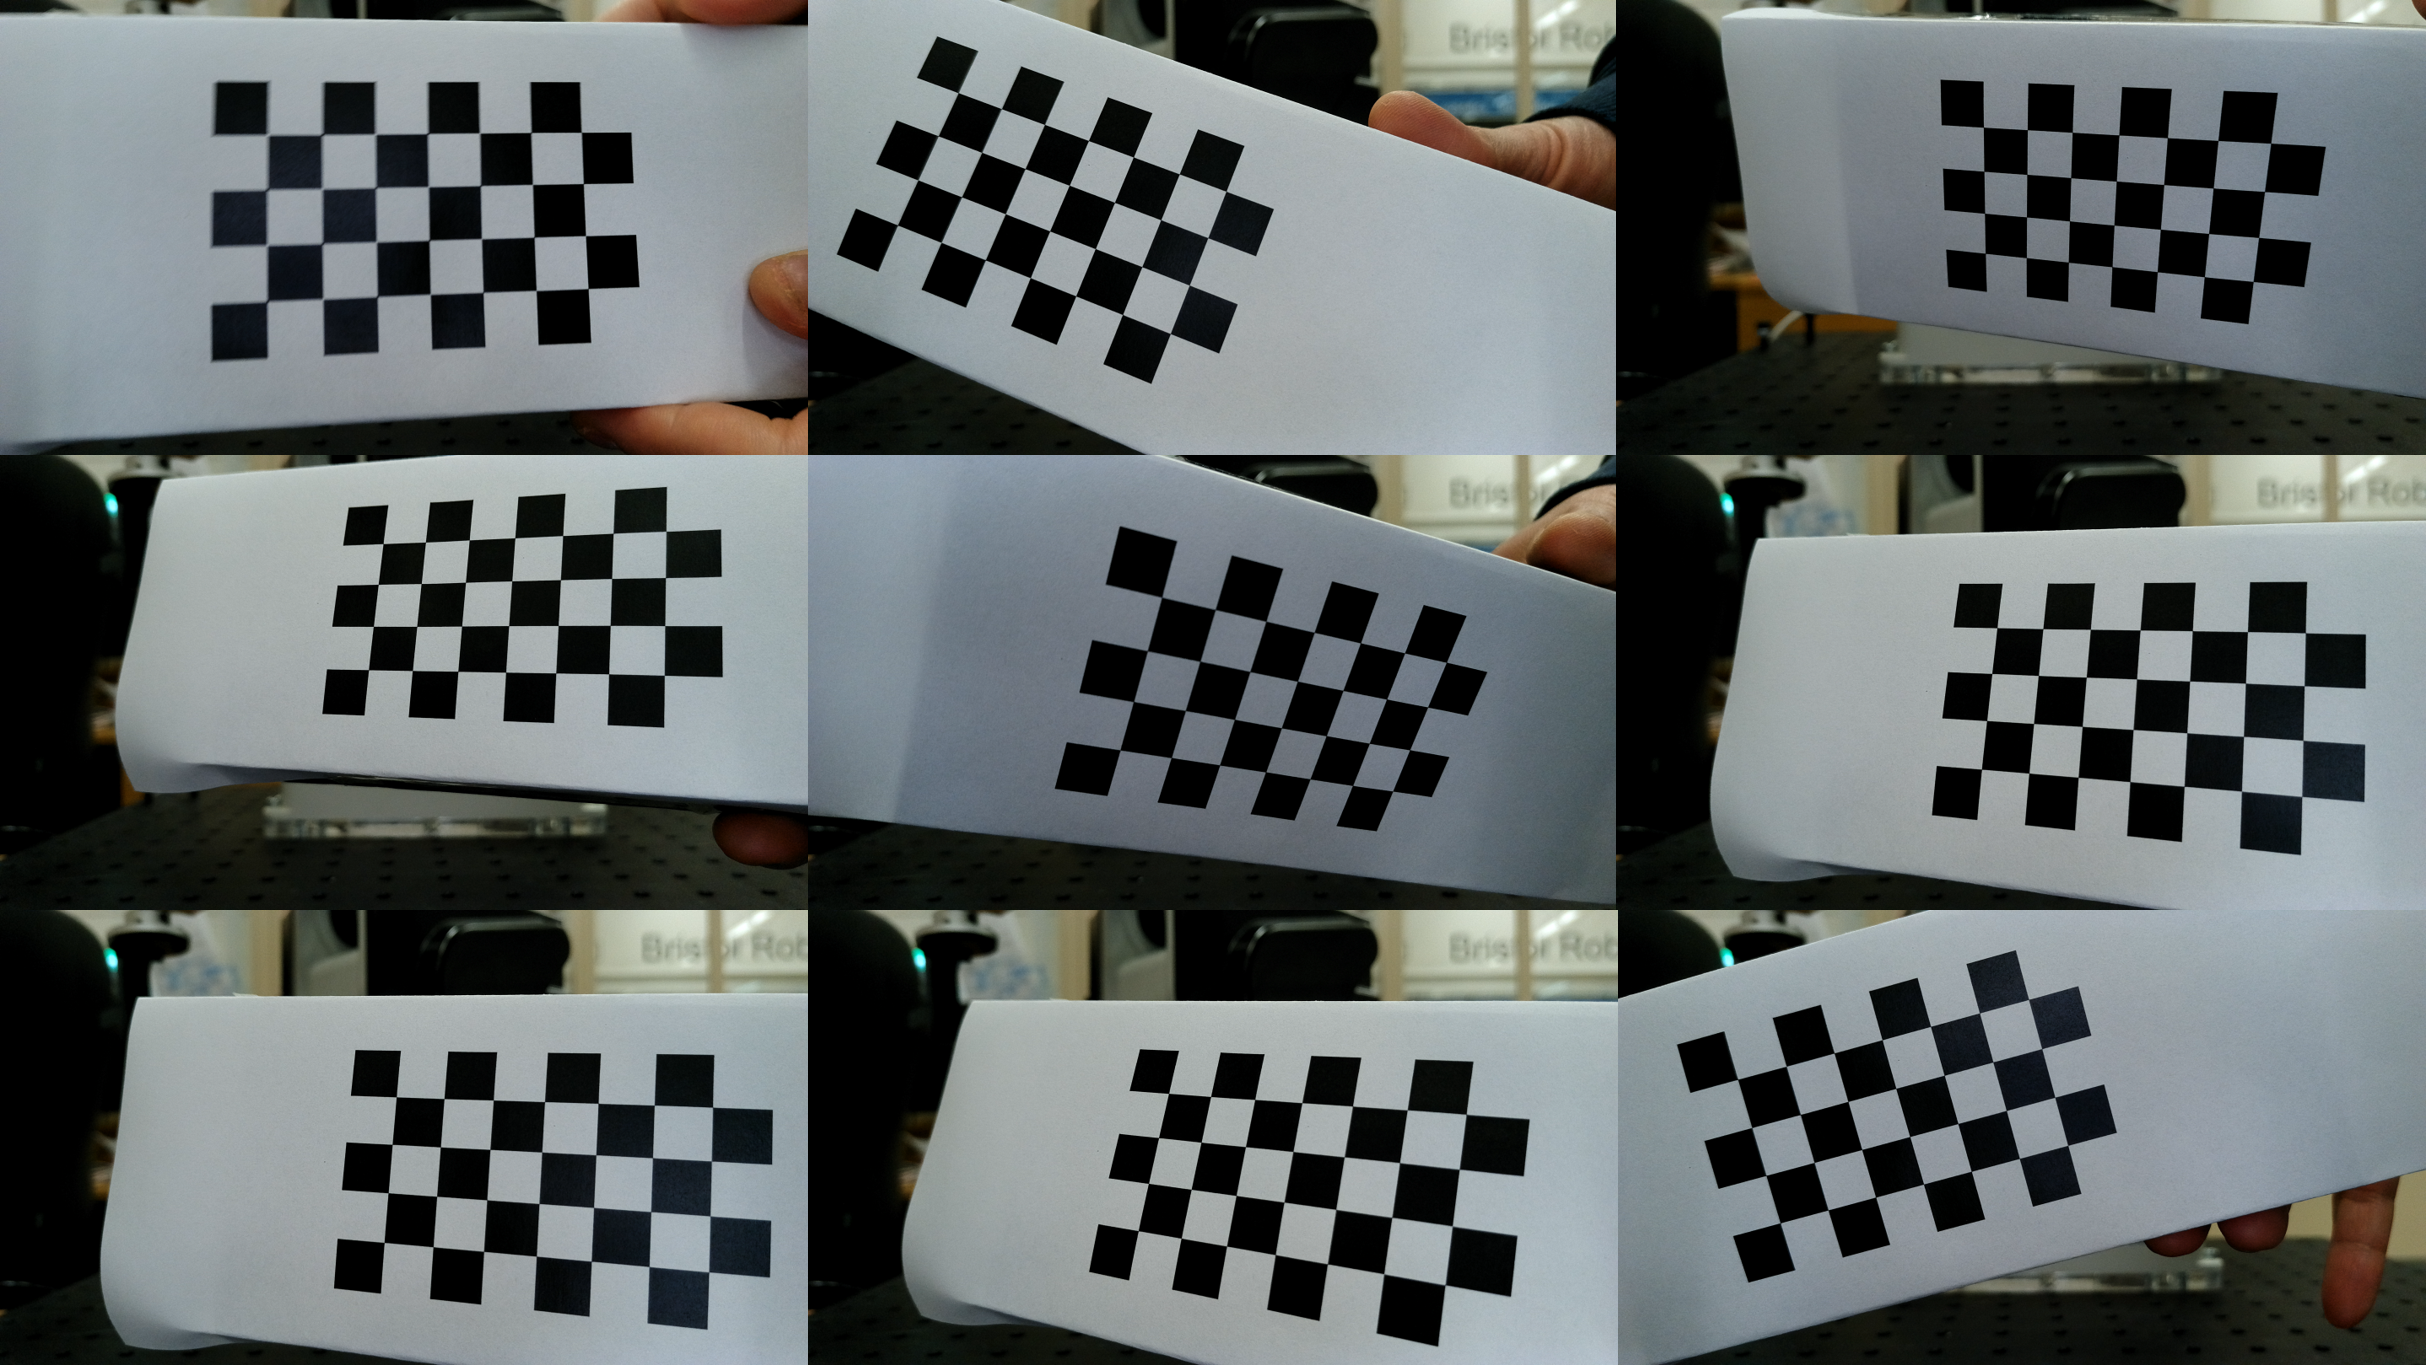
Please ensure to discard any images that do not fully display the entire checkerboard.
The complete set of codes is available for download from my Github repository. Please check 01_picture_taking.py
import cv2
import time
import os
import pathlib

if __name__ == '__main__':
    #####################
    # 1. Setup the camera
    #####################
    camera_channel = 1
    cap = cv2.VideoCapture(camera_channel)


    current_dir = pathlib.Path(__file__).parent.resolve()
    image_dir = os.path.join(current_dir, "captured_images")

    k = 0
    while True:
        ##########################################
        # 2. Show captured images
        ##########################################
        _, image = cap.read()

        cv2.imshow('captured image', image)
        time.sleep(3)

        ##########################################
        # 3. Save images once every three seconds
        ##########################################
        image_name = "test_" + str(k) + ".png"
        image_path = os.path.join(image_dir, image_name)
        cv2.imwrite(image_path, image)
        print(f'{image_name} is saved ... ')

        k += 1

        if cv2.waitKey(1) & 0xFF == ord('q'):
            break

    # When everything done, release the capture
    cap.release()
    cv2.destroyAllWindows()
5.4. Extract the parameters ($K$, $D$)
The Python script provided below extracts the intrinsic parameters ($K$) and lens distortion coefficients ($D$), then stores them in a YAML file.
The complete set of codes is available for download from my Github repository. Please check 02_camera_calibration.py
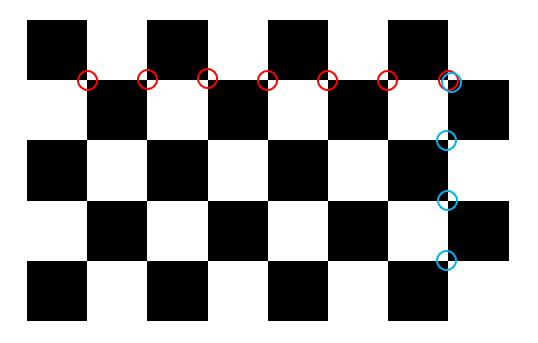
Before executing the Python code below, you should specify the square size (for example, in meters) and the number of corners in both the width and height directions. Please check Figs.4-5.

import numpy as np
import cv2
import glob
import argparse
import pathlib
import os


'''
https://aliyasineser.medium.com/opencv-camera-calibration-e9a48bdd1844
'''

# termination criteria
criteria = (cv2.TERM_CRITERIA_EPS + cv2.TERM_CRITERIA_MAX_ITER, 30, 0.001)


def calibrate(dirpath, prefix, image_format, square_size, width=9, height=6):
    """ Apply camera calibration operation for images in the given directory path. """
    # prepare object points, like (0,0,0), (1,0,0), (2,0,0) ....,(8,6,0)

    objp = np.zeros((height*width, 3), np.float32)
    objp[:, :2] = np.mgrid[0:width, 0:height].T.reshape(-1, 2)

    objp = objp * square_size

    # Arrays to store object points and image points from all the images.
    objpoints = []  # 3d point in real world space
    imgpoints = []  # 2d points in image plane.

    if dirpath[-1:] == '/':
        dirpath = dirpath[:-1]
    # dirpath = os.path.normpath(dirpath)

    gen_path = dirpath+'/' + prefix + '*.' + image_format
    print(gen_path)

    images = glob.glob(dirpath+'/' + prefix + '*.' + image_format, recursive=True)

    for fname in images:
        img = cv2.imread(fname)
        gray = cv2.cvtColor(img, cv2.COLOR_BGR2GRAY)

        # Find the chess board corners
        ret, corners = cv2.findChessboardCorners(gray, (width, height), None)

        # If found, add object points, image points (after refining them)
        if ret:
            objpoints.append(objp)

            corners2 = cv2.cornerSubPix(gray, corners, (11, 11), (-1, -1), criteria)
            imgpoints.append(corners2)

            # Draw and display the corners
            img = cv2.drawChessboardCorners(img, (width, height), corners2, ret)

    ret, mtx, dist, rvecs, tvecs = cv2.calibrateCamera(objpoints, imgpoints, gray.shape[::-1], None, None)

    return [ret, mtx, dist, rvecs, tvecs]

def save_coefficients(mtx, dist, path):
    """ Save the camera matrix and the distortion coefficients to given path/file. """
    cv_file = cv2.FileStorage(path, cv2.FILE_STORAGE_WRITE)
    cv_file.write("K", mtx)
    cv_file.write("D", dist)
    # note you *release* you don't close() a FileStorage object
    cv_file.release()

def load_coefficients(path):
    """ Loads camera matrix and distortion coefficients. """
    # FILE_STORAGE_READ
    cv_file = cv2.FileStorage(path, cv2.FILE_STORAGE_READ)

    # note we also have to specify the type to retrieve other wise we only get a
    # FileNode object back instead of a matrix
    camera_matrix = cv_file.getNode("K").mat()
    dist_matrix = cv_file.getNode("D").mat()

    cv_file.release()
    return [camera_matrix, dist_matrix]


if __name__ == '__main__':
    current_dir = pathlib.Path(__file__).parent.resolve()
    dirpath = os.path.join(current_dir, "captured_images")
    prefix = "test_"
    image_format = "png"
    square_size = 0.01
    width = 7
    height = 4
    file_name = 'intrinsic_params.yaml'

    parser = argparse.ArgumentParser(description='Camera calibration')
    parser.add_argument('--image_dir', type=str, default=dirpath, help='image directory path')
    parser.add_argument('--image_format', type=str, default=image_format, help='image format, png/jpg')
    parser.add_argument('--prefix', type=str, default=prefix, help='image prefix')
    parser.add_argument('--square_size', type=float, default=square_size, help='chessboard square size')
    parser.add_argument('--width', type=int, default=width, help='chessboard width size, default is 9')
    parser.add_argument('--height', type=int, default=height, help='chessboard height size, default is 6')
    parser.add_argument('--save_file', type=str, default=file_name, help='YML file to save calibration matrices')

    args = parser.parse_args()

    # args = parser.parse_args([dirpath])
    args.image_dir = dirpath
    args.image_format = image_format
    args.prefix = prefix
    args.square_size = square_size
    args.width = width
    args.height = height
    args.save_file = file_name

    print(args)

    ret, mtx, dist, rvecs, tvecs = calibrate(args.image_dir, args.prefix, args.image_format, args.square_size, args.width, args.height)
    save_coefficients(mtx, dist, args.save_file)
    print("Calibration is finished. RMS: ", ret)
5.5. Check results
You can compare the rectified image with the original image.
The complete set of codes is available for download from my Github repository. Please check 03_image_rectification_test.py
import cv2
import pathlib
import os

def load_coefficients(path):
    """ Loads camera matrix and distortion coefficients. """
    # FILE_STORAGE_READ
    cv_file = cv2.FileStorage(path, cv2.FILE_STORAGE_READ)

    # note we also have to specify the type to retrieve other wise we only get a
    # FileNode object back instead of a matrix
    camera_matrix = cv_file.getNode("K").mat()
    dist_matrix = cv_file.getNode("D").mat()

    cv_file.release()
    return [camera_matrix, dist_matrix]

def undistort_image(image, K, D):
    h, w = image.shape[:2]
    new_camera_matrix, roi = cv2.getOptimalNewCameraMatrix(K, D, (w,h), 1, (w,h))

    # Undistort the image
    dst = cv2.undistort(image, K, D, None, new_camera_matrix)

    # Crop the image (optional)
    x, y, w, h = roi
    dst = dst[y:y+h, x:x+w]

    return dst

def resize_image(image, scale_percent):
    width = int(image.shape[1] * scale_percent / 100)
    height = int(image.shape[0] * scale_percent / 100)
    dim = (width, height)
    resized = cv2.resize(image, dim, interpolation=cv2.INTER_AREA)
    return resized

if __name__ == '__main__':
    current_dir = pathlib.Path(__file__).parent.resolve()
    calib_file_path = os.path.join(current_dir, "intrinsic_params.yaml")
    img_file_path = os.path.join(current_dir, "captured_images", "test_53.png")

    [K, D] = load_coefficients(calib_file_path)

    img = cv2.imread(img_file_path)

    calibrated_img = undistort_image(img, K, D)

    # Resize the images by 50%
    img_resized = resize_image(img, 50)
    calibrated_img_resized = resize_image(calibrated_img, 50)

    cv2.imshow('Original Image', img_resized)
    cv2.imshow('Calibrated Image', calibrated_img_resized)
    cv2.waitKey(0)
    cv2.destroyAllWindows()

5.6. Play with coefficients
I strongly recommend dedicating time to comprehend the function of the coefficients in the two parameters. By using an image with grids and the aforementioned Python code, you can observe the distortion effects on the grid as you adjust the coefficients. Here is an example to illustrate this.
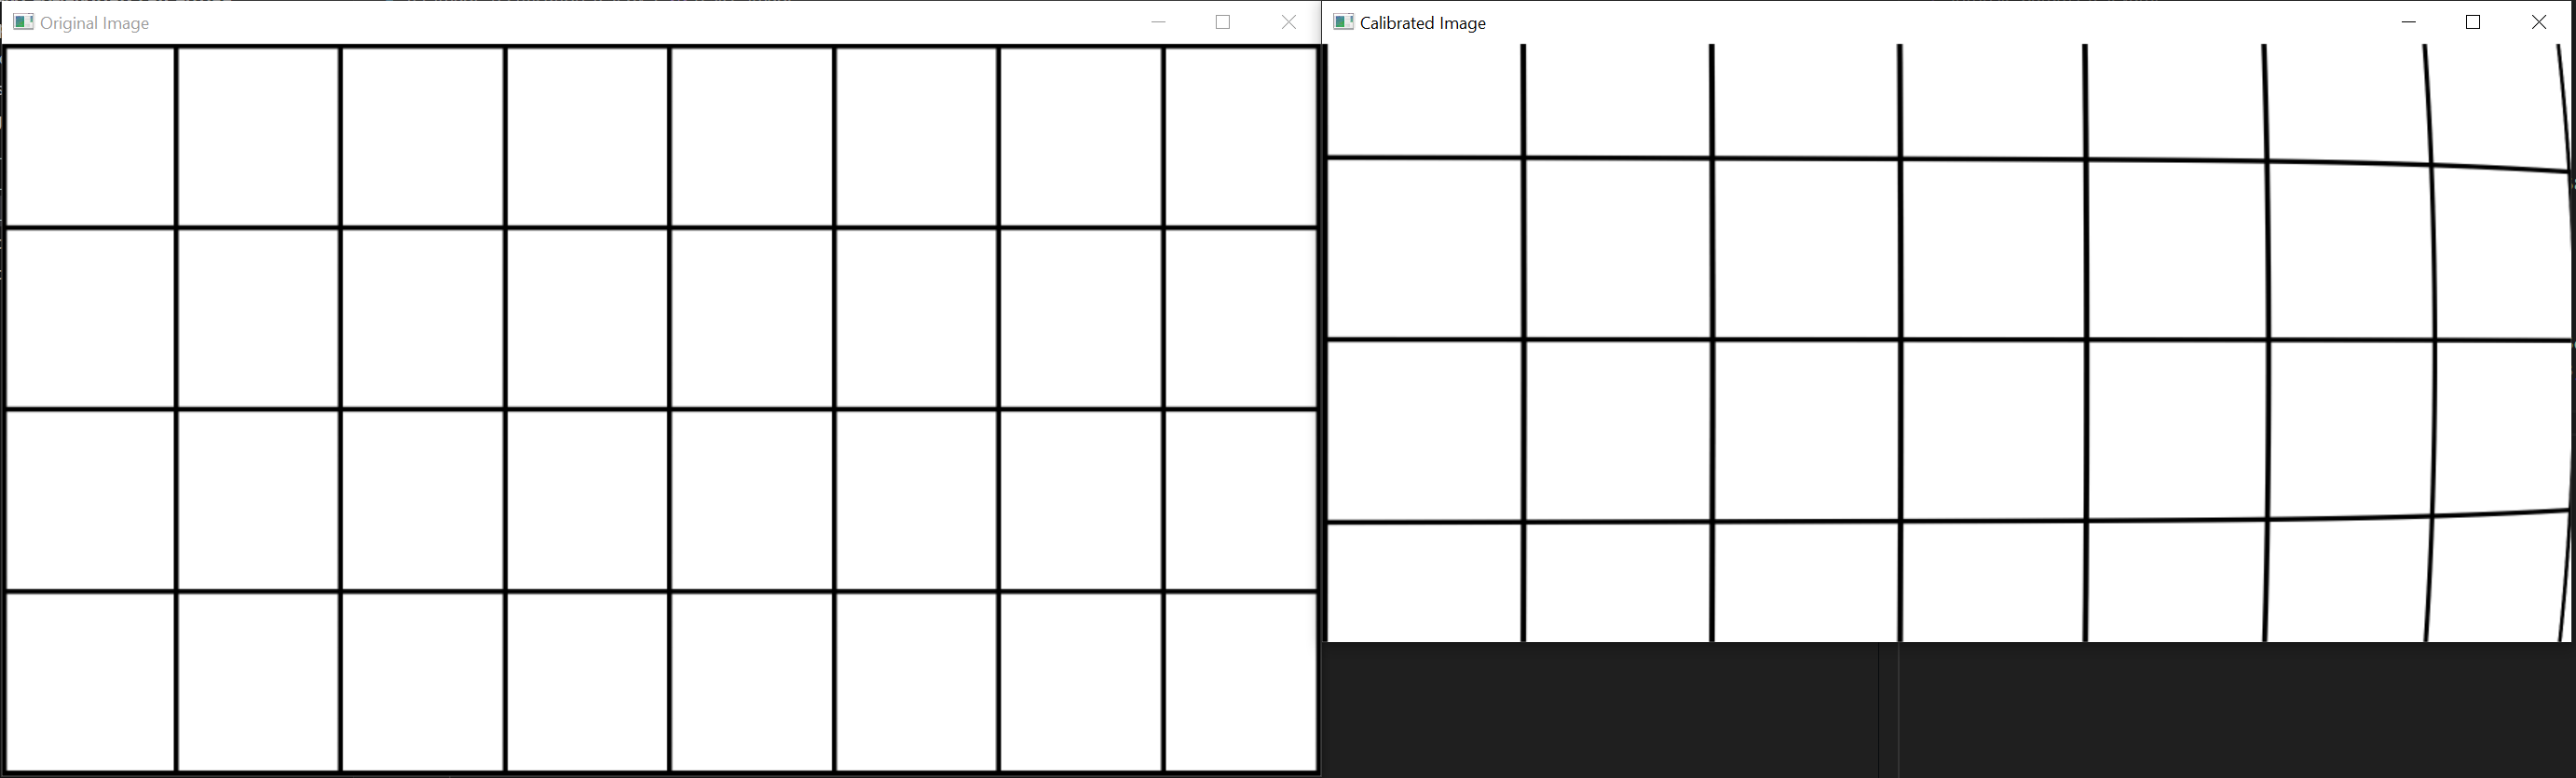
Fig.7 illustrates the distortion effect on the image resulting from altering a single parameter within the $K$ and $D$ matrices.